Identify fake job postings! - part 2

Highly skilled and experienced software engineer with a strong foundation in computer engineering and deep learning. Proficient in a variety of programming languages including C#, SQL, and Python. Achieved Data Scientist Professional and Data Analyst Associate certifications from DataCamp, as well as a Deep Learning Specialization from DeepLearning.AI. Possesses excellent troubleshooting and problem-resolution skills, a positive and friendly attitude, and a strong work ethic. Fluent in Portuguese and English. Proven success as a team leader, project manager, and software developer, with experience in the oil and gas industry and implementing ERP solutions.
Part 2 - is about the setup of DagsHub, DVC, and MLFlow to create a version-controlled data science project, as well as tracking experiment parameters and metrics, and comparing experiments.
Problem statement:
My friend is on the job market. However, they keep wasting time applying for fraudulent job postings. They have asked me to use my data skills to filter out fake postings and save them effort. They have mentioned that job postings are abundant, so they would prefer my solution to risk filtering out real posts if it decreases the number of fraudulent posts they apply to. I have access to a dataset consisting of approximately 18'000 job postings, containing both real and fake jobs.
Story published with Jupyter2Hashnode
Have you ever struggled to convert a Jupyter Notebook into a compelling Hashnode story? If so, you're not alone. It can be a daunting task, but fortunately, there's a tool that can simplify the process: Jupyter2Hashnode.
With Jupyter2Hashnode, you can convert Jupyter Notebooks into Hashnode stories with just a single command. The tool compresses images, uploads them to the Hashnode server, updates image URLs in the markdown file, and finally, publishes the story article. It's an effortless way to transform your data analysis or code tutorials into a polished and engaging format.
If you're interested in learning more about Jupyter2Hashnode, there's a detailed guide available on Hashnode (https://tiagopatriciosantos.hashnode.dev/jupyter2hashnode-an-effortless-way-to-convert-jupyter-notebooks-to-hashnode-stories). It's a game-changing tool that can save you time and energy while helping you create high-quality content for your audience. Give it a try and see the difference for yourself!
The part 2
This end-2-end ML (Machine Learning) project is divided into a 3-part series.
Part 1 - is all about getting to know the Dataset using Exploratory analysis, cleaning data, choosing the metrics, and doing the first model prediction experiments.
Part 2 - is about the setup of DagsHub, DVC, and MLFlow to create a version-controlled data science project, as well as tracking experiment parameters and metrics, and comparing experiments.
Part 3 - is all about deployment, where using MLFlow and FastApi we will deploy the model into a WebAPI and serve it with Mogenius, a Virtual DevOps platform.
Check out the DagsHub project here.
Tools
For this part, I will use git and VS Code as editor.
Follow the instructions to install:
I assume to have a working Python 3 installation on the local system.
What is DagsHub?
https://dagshub.com/
DagsHub is where people build data science projects. A centralized place to host, version, and manage code, data, models, experiments, and more. It allows you and your team to easily share, review, and reuse work, providing a GitHub experience for machine learning. By default DagsHub also provides an MLflow tracking server for the repository.
I will show the steps that I've used to set up the project, although feel free to follow DagsHub tutorials to get a different understanding of the tool:
https://dagshub.com/docs/experiment_tutorial/
https://dagshub.com/docs/integration_guide/mlflow_tracking/index.html
Joining DagsHub...
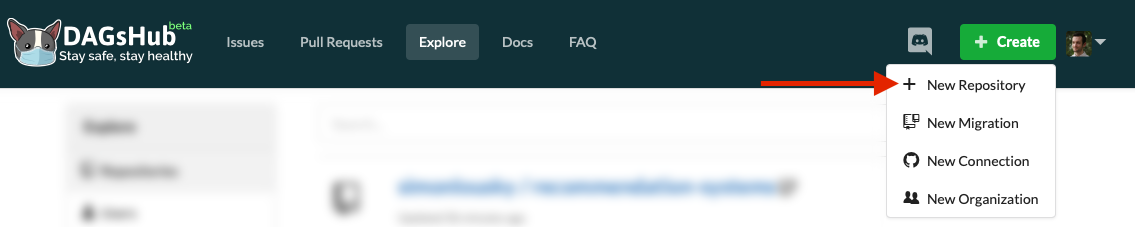
...is really easy. Just sign up. Then, after logging in, create a new repo, simply by clicking on the plus sign and creating a repository in the navbar.
This opens up a dialog, which should be somewhat familiar, in which you can set the repository name, description, and a few other options.

Let's now clone the repository into our local machine, copying the clone command on the Dagshub repository.

Execute this commands in the command line:
cd path/to/folder
git clone https://dagshub.com/tiagopatriciosantos/FakeJobPostsProject.git
cd FakeJobPostsProject
With VS Code already installed, we can now run:
code .
That will open the VS Code editor.
Creating a virtual python environment
To create and activate our virtual python environment using venv, type the following commands into your terminal (still in the project folder):
Linux/Mac
python3 -m venv .venv
echo .venv/ >> .gitignore
source .venv/bin/activate
Windows
python3 -m venv .venv
echo .venv/ >> .gitignore
.venv\Scripts\activate.bat
The first command creates the virtual environment - a directory named .venv, located inside your project directory, where all the Python packages used by the project will be installed without affecting the rest of your computer.
The second command activates the virtual python environment, which ensures that any python packages we use don't contaminate our global python installation.
The rest of this tutorial should be executed in the same shell session. If exit the shell session or want to create another, we need to make sure to activate the virtual environment in that shell session first.
Installing requirements
To install the requirements for the first part of this project, I've created a new file with the name requirements.txt and placed the text inside with these direct dependencies:
dagshub==0.2.9
dvc==2.38.1
fsspec==2022.11.0
joblib==1.2.0
pandas==1.5.2
scikit-learn==1.2.0
typer==0.7.0
rich==13.0.0
aiohttp==3.8.3
mlflow==2.1.1
python-dotenv==0.21.1
Now, to install type:
pip install -r requirements.txt
Downloading the raw data
We'll keep our data in a folder named data.
It's also important to remember to add this folder to .gitignore! We don't want to accidentally commit large data files to Git.
The following commands should take care of everything:
mkdir -p data
echo /data/ >> .gitignore
Linux/Mac
wget https://dagshub.com/tiagopatriciosantos/Datasets/raw/f3ddde257b100018bcb22a7231f899462b34c58f/data/fake_job_postings.csv -O data/fake_job_postings.csv
Windows PowerShell
Invoke-WebRequest https://dagshub.com/tiagopatriciosantos/Datasets/raw/f3ddde257b100018bcb22a7231f899462b34c58f/data/fake_job_postings.csv -O data/fake_job_postings.csv
Windows command line
cd data
curl.exe https://dagshub.com/tiagopatriciosantos/Datasets/raw/f3ddde257b100018bcb22a7231f899462b34c58f/data/fake_job_postings.csv -O fake_job_postings.csv
Committing progress to Git
Let's check the Git status of our project:
$ git status -s
?? .gitignore
?? requirements.txt
Now let's commit this to Git and push it to DagsHub using the command line:
git add .
git commit -m "Initialized project"
git push -u origin main
You can now see the setup files on your DagsHub repo. So far so good.
Installing DVC
Installing DVC is as simple as To start, we need to initialize our git repo to also use DVC for data versioning:
dvc init
The following directory structure should be created:
.dvc
├── .gitignore
├── config
├── plots
│   ├── confusion.json
│   ├── default.json
│   ├── scatter.json
│   └── smooth.json
└── tmp
This is somewhat similar to the .git folder contained in every git repo, except some of its contents will be tracked using git.
.dvc/config is similar to .git/config. By default, it's empty. More on this later on.
.dvc/.gitignore makes sure git ignores DVC internal files that shouldn't be tracked by Git.
.dvc/plots contain predefined templates for plots you can generate using dvc - more info here.
.dvc/tmp is used by DVC to store temporary files, this shouldn't interest the average user.
.dvc/cache doesn't exist yet, but it is where DVC will keep the different versions of our data files. It's very similar in principle to .git/objects.
Some of the files generated by dvc init should be tracked by Git, so let's start by committing that:
git add .dvc
git commit -m "dvc init"
Instructing DVC to track data and outputs
Let's create a directory to save our outputs, outputs like the ML model we will create and save:
mkdir -p outputs
echo /outputs/ >> .gitignore
Note that our outputs are also in .gitignore - you usually won't want to save these using Git, especially if dealing with large models like neural networks.
Now that we have DVC installed, telling it to keep track of our data and outputs is simple with dvc to add:
dvc add data
dvc add outputs
You should see two new metadata files, created by DVC:
$ git status -s
 M .gitignore
?? data.dvc
?? outputs.dvc

$ cat data.dvc
outs:
- md5: 714b1181c5d7cb9dda66272be8be33ac.dir
  path: data

$ cat outputs.dvc
outs:
- md5: bc939fd1899e52dd1a5c65be0443986a.dir
  path: outputs
Now, we can commit these .dvc files to Git:
git add data.dvc outputs.dvc
git commit -m "Added data and outputs to DVC"
From now on, this version of the data and models will be tied to this Git commit, and we'll be able to reproduce them easily later on.
Writing the code
Let's use our existing insights and code from the data exploration level to get started writing code that:
Loads the data
Processes the data
Trains a classification model
Evaluates the trained model and report relevant metrics.
We'll structure our project into the fowling folders and files:
.
│   .dvcignore
│   .env    --> File to store local environment variables
│   .gitignore
│   data.dvc
│   LICENSE
│   main.py    --> File that is the starting point of our cli application
│   outputs.dvc
│   README.md
│   requirements.txt    --> File that have all the necessary dependencies to make our project run
├───.dvc
│   │   .gitignore
│   │   config
│   ├───cache
│   └───tmp
├───custom_code    --> folder to store the custom code like class's
│       transformer.py    -> StringConcatTransformer trasnformer that will concat columns
│       __init__.py
├───data    --> folder to store the data
│       fake_job_postings.csv
├───outputs    --> folder to store outputs like the ML model
├───src    --> folder to store code that executes preprocess, training, model evaluation, ...
│   │   constants.py
│   │   data_preprocess.py
│   │   model.py
You can find the full code at https://dagshub.com/tiagopatriciosantos/FakeJobPostsProject
Let's dig into some code explanation:
.env
This file stores the necessary environment variables and will be used when calling load_dotenv()
MLFLOW_TRACKING_USERNAME=tiagopatriciosantos
MLFLOW_TRACKING_PASSWORD=<secret>
🚩🚨 Don't forget to include this file in the .gitignore file, you don't want to push to your public repository your secrets.
echo .env >> .gitignore
We can get the necessary MLFlow values from the Dagshub repository:

main.py
We call
load_dotenvto load the necessary environment variablesUsing
Repowe store the current git branch nameWe then set
MLFlowto track our mlflow Dagshub URI and the experiment name as our current git branch name, we set also that mlflow will autolog but not the model, we will "manually" save the model with some custom information Dagshub integration guide | MLFlow docsUsed
Typerlibrary for building the CLI application Typer docsWe have created 4 different commands that can be called in the command line, check the docstrings in the code to find out more
import typer
import mlflow
from git import Repo
from src import data_preprocess
from src import model
from rich import print

## loads environment variables from .env file
from dotenv import load_dotenv
load_dotenv()

## gets the current git local branch name
local_repo = Repo(path=".")
local_branch = local_repo.active_branch.name


mlflow.set_tracking_uri("https://dagshub.com/tiagopatriciosantos/FakeJobPostsProject.mlflow")
mlflow.set_experiment(local_branch)
mlflow.sklearn.autolog(log_models=False)

app = typer.Typer()

@app.command()
def clean():
    """
    This function cleans the raw data from the CSV file.
    The cleaned data is saved to a new CSV file.
    """
    data_preprocess.clean()


@app.command()
def split():
    """
    Split the data into train and test sets.
    This function will create 2 files:
        TRAIN_DF_PATH
        TEST_DF_PATH
    """
    data_preprocess.split()

@app.command()
def train():
    """
    This function trains a model on the data in the TRAIN_DF_PATH and TEST_DF_PATH files.
    It saves the trained model to the outputs/model.joblib file.
    It logs the model's hyperparameters and metrics to DAGsHub.
    """
    model.train()

@app.command()
def runall():
    """
    Run all the steps of the pipeline.
    """
    data_preprocess.clean()
    data_preprocess.split()
    model.train()


if __name__ == '__main__':
    app()
src/data_preprocess.py
This file contains the code to:
Clean the raw data from the CSV file. It removes non-ASCII characters, strips the text, and inserts one whitespace between the lower capital letters and capitalized letters. The cleaned data is saved to a new CSV file.
Feature engineering
Splits the data into train and test sets and writes them to files
For our first experiment, we will only select the columns
title,description,has_company_logo
src/model.py
This file contains the code necessary to build, train and evaluate the model.
_build_model:
The model is a pipeline where we will have some initial transformers that will work the features to use in our model to train and evaluate
col_selectorwill force us to use only the defined columns that we want in this experiment, we need to callset_outputto "pandas" to retain a Dataframe structure with columns namesStringConcatTransformerwill join the columns ["title", "description"]the column "has_company_logo" does not need any transformation as it always has values between 0 and 1
The final estimator in our first experiment will be the Logistic regression
The eval_model tfunction evaluates a trained model on a data set using the average precision, precision, recall, and f1-score metrics.
train:
the
trainfunction will load the csv, call our_build_modelfunction, train, evaluate and save the modelusing the
dagshub_loggerwe save the metrics and themodel.joblibinto our outputs folder, we then can upload our repository this outputsusing mlflow.start_run() as we set the
autolog()autologging is performed when you call estimator.fit(), estimator.fit_predict() or estimator.fit_transform() and will save the different default metricsmlflow.pyfunc.log_modelLog a wrapped custom model as an MLflow artifact for the current run. Because we have a custom transformer in our pipeline and the model wrapper we need to setcode_pathto this custom code so is available when loading this model. Will store all the artifacts under the path namedmasterand will register the model asmaina registered_model_name. MLFlow docs
import dagshub
import pandas as pd
from sklearn.feature_extraction.text import TfidfVectorizer
from sklearn.linear_model import LogisticRegression
from sklearn import metrics
from sklearn.pipeline import Pipeline
from sklearn.compose import ColumnTransformer
from rich import print
from .constants import *
import joblib
import mlflow
from mlflow.models import infer_signature
from custom_code import StringConcatTransformer, ModelWrapper

def _build_model():

    cols = ["title","description", "has_company_logo"]
    # transformer to filter columns
    col_selector = ColumnTransformer([ ("cols", "passthrough", cols)  ],remainder="drop",verbose_feature_names_out=False )
    col_selector.set_output(transform="pandas")

    # transformer to join text columns and apply TfidfVectorizer
    text_preprocess = ColumnTransformer(
        [(
            'processing',
            Pipeline([
                        ("concat", StringConcatTransformer() ),
                        ("vect",TfidfVectorizer(max_features=25000, ngram_range=(1,2)) )
                    ]),
            ['title', 'description']
        )],
        remainder="passthrough")

    # create the final pipeline with preprocessing steps and
    # the final classifier step
    pipeline = Pipeline([
        ("select", col_selector),
        ('text', text_preprocess),
        ('clf', LogisticRegression(random_state=RANDOM_SEED, max_iter=500))
    ])

    return pipeline

def eval_model(estimator, X, y, threshold=0.5):
    """
    Evaluate a model using the metrics:
        - average_precision
        - precision
        - recall
        - f1

    Parameters
    ----------
    estimator : sklearn estimator
        The estimator to evaluate.
    X : array-like, shape (n_samples, n_features)
        The input samples.
    y : array-like, shape (n_samples,)
        The target values.

    Returns
    -------
    dict
        A dictionary containing the metrics.
    """

    y_proba = estimator.predict_proba(X)[:,1]

    y_pred = y_proba > threshold


    return {
        'average_precision': metrics.average_precision_score(y, y_proba),
        'precision': metrics.precision_score(y, y_pred),
        'recall': metrics.recall_score(y, y_pred),
        'f1': metrics.f1_score(y, y_pred)
    }

def train():
    """
    This function trains a model on the data in the TRAIN_DF_PATH and TEST_DF_PATH files.
    It saves the trained model to the outputs/model.joblib file.
    It logs the model's hyperparameters and metrics to DAGsHub.
    """
    print('Loading data from files', TRAIN_DF_PATH, TEST_DF_PATH,"...")
    train_df = pd.read_csv(TRAIN_DF_PATH)
    test_df = pd.read_csv(TEST_DF_PATH)

    X_train = train_df.drop(columns=[CLASS_LABEL])
    y_train = train_df[CLASS_LABEL]
    X_test = test_df.drop(columns=[CLASS_LABEL])
    y_test = test_df[CLASS_LABEL]

    with dagshub.dagshub_logger(metrics_path="./outputs/metrics.csv", hparams_path="./outputs/params.yml") as logger, mlflow.start_run() as run:


        print('Building the model...')
        model = _build_model()

        print('Training the model...')

        model.fit(X_train, y_train)

        print('Saving trained model...')
        joblib.dump(model, 'outputs/model.joblib')

        print(model.get_params())
        logger.log_hyperparams({'model': model.get_params()})

        model_clf_name = model.get_params()["clf"].__class__.__name__

        mlflow.set_tag('estimator_name', model_clf_name )

        # based on our analysis we will define this threshold
        threshold=0.0485
        print('Evaluating model...')
        train_metrics = eval_model(model, X_train, y_train, threshold)

        print('Threshold:', threshold)
        mlflow.set_tag('estimator_threshold', threshold )
        threshold_to_log= {"threshold":threshold}
        logger.log_metrics(threshold_to_log)
        mlflow.log_metrics(threshold_to_log)


        print('Train metrics:')
        print(train_metrics)
        metrics_to_log = {f'train__{k}': v for k,v in train_metrics.items()}
        logger.log_metrics(metrics_to_log)
        mlflow.log_metrics(metrics_to_log)

        test_metrics = eval_model(model, X_test, y_test, threshold)
        print('Test metrics:')
        print(test_metrics)
        metrics_to_log = {f'test__{k}': v for k,v in test_metrics.items()}
        logger.log_metrics(metrics_to_log)

        mlflow.log_metrics(metrics_to_log)

        y_pred =  model.predict_proba(X_test)[:,1]>0.5

        signature = infer_signature(X_test, y_pred)

        mlflow.pyfunc.log_model("master",
                                python_model=ModelWrapper(model, threshold=threshold),
                                signature=signature,
                                code_path=["custom_code"],
                                registered_model_name="main",
                                await_registration_for=10,
                                input_example = X_test.sample(5, random_state=RANDOM_SEED),
                                metadata=threshold_to_log
                                )
custom_code/transformer.py
This file contains the class StringConcatTransformer, this class concatenates multiple string fields into a single field, and inherits from TransformerMixin, BaseEstimator, and ClassNamePrefixFeaturesOutMixin so we can use it in the Pipeline.
from sklearn.base import TransformerMixin, BaseEstimator, ClassNamePrefixFeaturesOutMixin
import numpy as np

class StringConcatTransformer(TransformerMixin, BaseEstimator, ClassNamePrefixFeaturesOutMixin):
    """Concatenate multiple string fields into a single field.
    """

    def __init__(self, missing_indicator=''):
        """
        NAN value will be replaced by missing_indicator
        """
        self.missing_indicator = missing_indicator

    def fit(self, X, y=None):
        return self

    def transform(self, X):
        return np.array(X.fillna(self.missing_indicator).agg(' '.join, axis=1))

    def get_feature_names_out(self,input_features=None):
        return np.array(["Text"])
custom_code/model.py
This file contains the class ModelWrapper, and creates a wrapper for our model.
from mlflow.pyfunc import PythonModel, PythonModelContext
import numpy as np

class ModelWrapper(PythonModel):
    def __init__(self, model, threshold=0.5):
        self._model = model
        self._threshold = threshold

    #custom predict function using specific treshold
    def predict(self, context: PythonModelContext, data):
        return np.array(self._model.predict_proba(data)[:,1]>=self._threshold)
Executing the first experiment
Running the command we can see the commands we can execute:
python main.py --help

We will run now the commands, we start with the clean:
python main.py clean
Loading data from file data/fake_job_postings.csv ...
Cleaning data...
Saving data...
Clean completed, saved to file data/clean_fake_job_postings.csv.zip
Let's split the data into train and test:
python main.py split
Loading data from file data/clean_fake_job_postings.csv.zip ...
Saving split data...
Split completed, created 2 files data/train.csv.zip data/test.csv.zip
Let's now build the model, train, and evaluate:
python main.py train
...
Model name: main, version 1
Created version '1' of model 'main'.
Committing progress to Git, again
So, until now we have made a lot of progress, with the last step we have executed the experimentation, which generated files and uploaded info to the remote MLflow server provided by Dagshub.
Let's check the DVC status of our project:
$ dvc status
data.dvc:
        changed outs:
                modified:           data
outputs.dvc:
        changed outs:
                modified:           outputs
We can see that we have new data and outputs, so we need to commit: To recording the md5 of the new model, and save it to .dvc/cache, as well as the data files created when cleaning and splitting the raw Dataset, we now can run:
dvc commit -f
This updates the outputs.dvc and data.dvc files with the hash of the new files, as well as store in .dvc/cache, let's see them:
$ cat data.dvc
outs:
- md5: ea9d5d288c7904bbc412a2064dfa22f9.dir
  size: 83661055
  nfiles: 4
  path: data

$ cat outputs.dvc
outs:
- md5: 7b0ef7da6f9aa6ce1069530121b7bf7d.dir
  size: 32650684
  nfiles: 3
  path: output
Let's check the Git status of our project:
$ git status -s
 M .gitignore
 M requirements.txt
?? custom_code/
?? data.dvc
?? main.py
?? outputs.dvc
?? src/
Now let's commit this to Git and push it to DagsHub using the command line:
git add .
git commit -m "First LogisticRegression experiment"
Pushing code, data, and models to DagsHub
It's great to have saved versions of our data and models in our local workspace, but what if we have team members? Or if we want to continue work on some other machine?
DagsHub has you covered - not only can you push your Git code history to DagsHub, but you can also push (and later pull) all DVC managed files!
Let's create a script file to ask for the repo, user name, and password to store in dvc config files: Linux/Mac script set_dagshub_repo.sh
echo -n "Username: "
read DAGSHUB_USER
echo -n "Repo name: "
read DAGSHUB_REPO
echo -n "Password: "
read -s DAGSHUB_PASS
dvc remote add origin "https://dagshub.com/$DAGSHUB_USER/$DAGSHUB_REPO.dvc"  -f
dvc remote default origin --local
dvc remote modify origin --local user "$DAGSHUB_USER"
dvc remote modify origin --local auth basic
dvc remote modify origin --local password "$DAGSHUB_PASS"
unset DAGSHUB_PASS
Windows bat file set_dagshub_repo.bat
set /p DAGSHUB_USER="Username: "
set /p DAGSHUB_REPO="Repo name: "
set /p DAGSHUB_PASS="Password: "
dvc remote add origin https://DagsHub.com/%DAGSHUB_USER%/%DAGSHUB_REPO%.dvc"  -f
dvc remote default origin
dvc remote modify origin --local user %DAGSHUB_USER%
dvc remote modify origin --local auth basic
dvc remote modify origin --local password %DAGSHUB_PASS%
set DAGSHUB_PASS=
We can now execute the script and fill in the values: Linux/Mac
$ sh set_dagshub_repo.sh
Windows
> .\set_dagshub_repo.bat
You can see that some DVC stores some configurations in .dvc/config, which should be committed to Git:
$ git diff
diff --git a/.dvc/config b/.dvc/config
index e69de29..2d69bfe 100644
--- a/.dvc/config
+++ b/.dvc/config
@@ -0,0 +1,4 @@
+[core]
+    remote = origin
+['remote "origin"']
+    url = https://DagsHub.com/tiagopatriciosantos/FakeJobPostsProject.dvc
🚩🚨 Why use --local in the DVC remote commands?
Only configurations that are shared across collaborators should be stored in .dvc/config. The other configuration file is .dvc/config.local - it functions identically to .dvc/config, except it's ignored by Git. That's the correct way to store things like usernames and passwords. We used the --local flag to indicate to DVC that these configuration keys should only be stored locally. Make sure not to accidentally commit secret information to .dvc/config!
So, let's commit these configuration changes to git:
git add .dvc/config
git commit -m "Configured the DVC remote"
And push to our repo:
git push -u origin main
dvc push --all-commits
Now, any future collaborator can git clone and then dvc pull the data and models from any version.
Executing a new experiment
Now, to run a different experiment, for example using a RandomForestClassifier, the best approach is to create a new branch.
Now, we can let our imaginations run free with different configurations for experiments.
Here are a few examples:
We can change the type of model:
Random Forest model – model.py with RandomForestClassifier
Neural Network model – model.py with MLPClassifier
Adding features and one-hot encoding
We can play around with the parameters:
- We can try out different values for random forest's max_depth parameter – main.py with a different max depth
Etc.
After each such modification, we'll want to save our code and models. We can do that by running a set of commands like this:
python3 main.py train
dvc commit -f outputs.dvc
git checkout -b "Experiment branch name"  # It is recommended separating distinct experiments to separate branches. Read more in the note below.
git add .
git commit -m "Description of the experiment"
git checkout main
🗺 Branching strategy for experiments
Its often hard to decide what structure to use for your project, and there are no right answers – it depends on your needs and preferences. Dagshub recommendation is to separate distinct experiments (for example, different types of models) into separate branches, while smaller changes between runs (for example, changing model parameters) are consecutive commits on the same branch.
Pushing our committed experiments to DagsHub
To really start getting the benefits of DagsHub, we should now push our Git commit, which captures an experiment and its results, to DagsHub. That will allow us to visualize the results.
# You may be asked for your DagsHub username and password when running this command
git push --all
dvc push --all-commits
Visualizing experiments on DagsHub
To see our experiments visualized, we can navigate to the "Experiments" tab in our DagsHub repo:

This table has a row for each detected experiment in your Git history, showing its information and columns for hyperparameters and metrics. Each of these rows corresponds to an experiment train calls.
You can interact with this table to:
Filter experiments by hyperparameters: Filter experiments by model class
Filter & sort experiments by numeric metric values - i.e. easily find your best experiments: Filter experiments by minimum F1 test score
Choose the columns to display in the table - by default, we limit the number of columns to a reasonable number: Choose displayed columns
Label experiments for easy filtering.
Experiments labeled hidden are automatically hidden by default, but you can show them anyway by removing the default filter. Apply freestyle labels to experiments
Select experiments for comparison.
For example, we can check the top 3 best experiments: Select 3 experiments, then click on the Compare button to see all 3 of them side by side
MLflow UI
The DagsHub MLflow tracking server provides access to the MLflow server user interface (MLflow UI). To view the MLflow UI, visit the tracking server URI (https://dagshub.com/<username>/<repo>.mlflow) in a browser. If you haven't interacted with the main DagsHub interface in a while, you may have to enter your DagsHub username and password/access token into the authentication popup shown by your browser.
You should have full access to all views and actions provided by the MLflow UI. This includes viewing run details, comparing runs (within the same experiment only, to compare runs across experiments, visit the DagsHub experiment tracking interface), creating and managing experiments, and viewing and updating the model registry.
We can enter into the MLFlow UI by clicking on the button "Go to mlflow UI" under the Remote->Experiments

Part 2 Conclusion
In this part of the project, the setup of DagsHub, DVC, and MLFlow was demonstrated to create a version-controlled data science project, as well as tracking experiment parameters and metrics and comparing experiments. The steps for creating a virtual Python environment, installing requirements, and downloading raw data were also discussed. Finally, the code to load, process, train, and evaluate a classification model was shown, with environment variables stored in the .env file and tracked using MLFlow. This part of the project demonstrates the importance of using tools like DagsHub, DVC, and MLFlow to simplify data science workflows and ensure reproducibility.
Next...
In the next part of this series, we will use the MLFlow UI to serve the chosen model, create a WebAPI using FastAPI and deploy using Mogenius.


